MS is offering a free course (Server Virtualization with Windows Server Hyper-V and System Center) and
exam for Hyper-V and SystemCenter management (74-409). This blog contains my notes for the exam prep.
Course Instructors | Symon Perriman – Senior Technical Evangelist, Microsoft; Corey Hynes – Lead Architect and President, HOLSystems Related
Some resources
Download and explore
- Windows Server 2012 R2 Evaluation Guide (see server virtualization section)
- Windows Server 2012 R2 Virtualization: Whitepaper
- Exploring Windows Server 2012 R2 Hyper-V: Virtual Lab
- Windows Server 2012 R2 – Configuring and Managing Servers
- Windows Server 2012 R2 – Storage Infrastructure
- Windows Server 2012 R2 – Network Automation using IPAM
- Windows Server 2012 R2 – Exploring Hyper-V Server
- Visit the Windows Server 2012 R2 Evaluation Resources Page
- Try more Windows Server labs at the TechNet Virtual Labs site
- Download the System Center 2012 R2 evaluation to build on the Windows Server experience
Other courses
- Introduction to Hyper-V Jump Start
- Virtualization Training Courses: Microsoft Virtual Academy
- Explore FREE online learning at Microsoft Virtual Academy
My blogs on Installation, Win server and Virtualization
- Create a bootable USB: https://rasor.wordpress.com/2012/11/04/creating-an-usb-os-installation-drive/
- Enable WLAN and Hyper-V on a WinServer: https://rasor.wordpress.com/2010/04/02/virtualization-running-windows-server-2008-r2-as-hosthypervisor-on-a-laptop/
- Use Winserver on a laptop: https://rasor.wordpress.com/2012/10/05/win2012-sharepoint-2013-setup/
- https://rasor.wordpress.com/2012/12/12/xen-hypervisor/
- https://rasor.wordpress.com/2010/04/04/virtualization-running-virtualbox-on-a-windows-7-laptop-windows-2008-r2-server-guest/
Overview of virtualization stacks
This is notes from Module 1 – Evaluating the Environment for Virtualization
| Compare | Microsoft System Center | VMWare vCenter | Citrix XenServer (6.2) | RedHat EV |
| Automation | SC Orchestrator | vCenter Orchestrator | Workflow studio | CloudForms |
| Svc. Mgmt | SC Service Manager – Help Desk | vCloud Automation Center | ||
| Protection | SC Data Protection Manager | vSphere Data Protection | ||
| Monitoring | SC Operations Manager | vCenter Ops Mgmt. Suite | CloudForms | |
| Self-Service | SC App Controller
|
vCloud Director | Web Self Service (Retired) | User Portal |
| VM Mgmt | SC Virtual Machine Manager
|
vCenter Server | XenCenter | RHEV-M |
| Hypervisor | Hyper-V (2012 R2)
|
vSphere Hypervisor (ESXi 5.5) | XenServer (6.2) incl. Xen Project Hypervisor |
Enterprise Virtualization (3.2) KVM + RHEV-H or RHEL |
| Documentation | Solution Accelerators |
Other virtual managers
- Zabbix
- Virt-manager – VM’s: KVM, Xen, Lxc
Hyper-V Component Architecture Poster

Installation
For a test lab I used 2 laptops with 4 core I7 processor.
- Laptop 1
- Host: HyperV-Host – OS: WS12R2 – Role: Hyper-V Host (Hypervisor)
- Ext vSwitch: vEthernet (Realtek) – VLAN ID: 5
- Vm: VmN1Ad – OS: WS12R2 – Role: DNS and AD
- Ext vSwitch: vEthernet (Dell Wireless) – VLAN ID: 6
- Private vSwitch: (Priv1)
- VM: VmSrv1 – OS: WS12R2
- Ext vSwitch: vEthernet (Realtek) – VLAN ID: 5
- Host: HyperV-Host – OS: WS12R2 – Role: Hyper-V Host (Hypervisor)
- Laptop 2
- Host: W8-Host – OS: W8 -> W8Pro -> W8.1Pro – Role: Also a Hyper-V Host after upgrade to W8Pro :-), Remote PC
To use live migration of VMs you need to have the PC’s connected to AD.
It appeared that W8.1 Hyper-V does not support live migration, so I’ll install another server instead – later.
The installation more or less like this:
HyperV-Host
- # Create installation USB flash:
Created and booted USB flash drive with Rufus. Burned Windows Server 2012 R2 onto it from an iso image. - # Shrinked a disk:
Made space for 100 GB for WinServer as Hyper-V hypervisor. Made space for 150 GB for VMs (D:\). - # Installed WinServer on the disk from the bootable USB.
- Selected DataCenter version to be able to install lots of VM’s. I wonder if STD version just is limited on licenced guest OS’s – meaning if you own OS licences, then STD version is not limited?
- # Enabled WLAN feature. This is equivalent with the 2008 procedure. You might need to boot twice before you can enable the WLAN network card.
- Above procedure also included enabling of Hyper-V role. Did that too.
- Set VHD folder to D:\Hyper-V\VirtualHardDisks
- Set VM cfg file folder to D:\Hyper-V
- Selected both LAN and WLAN as Virtual Network Switches through which the VM’s reach physical network.
- After boot you can start virtmgmt.msc and manage your VMs.
- # Make WinServer a little more workstation-like:
- Disable shutdown tracker
- Rename your server name to something you like.
- # Enable Private Network Discovery:
- > Services.msc
- DNS Client, Function Discovery Resource Publication, SSDP Discovery, UPnP Device Host: Set Automatic startup and start
- Search and open “Network and Sharing Center” – Click on Advanced Sharing Settings – Expand Private
- Turn on network discovery
- Turn on file- and printer sharing
- On W8-Host:
- Make sure you can ping the server
- Search and open “Network” – refresh
- You should be able to see the server, if you are on the same (WIFI) network.
- > Services.msc
- # Enable Remote Desktop in the workgroup:
- Add Server Role “Remote Desktop Services” – Add Role Services “Remote Desktop Licencing” and “Remote Desktop Session Host”. Accept the Tools added as features. Reboot.
- In Server Manager – Local Server – Properties
- Enable Remote Management
- Enable Remote Desktop
- On W8-Host: Search and Open “Remote Desktop Connection”.
- Remote Screen Resolution 1440 * 900 fits nice into 1920 * 1080 Local resolution
- Logon with credentials of the target server.

- # Enable copy-paste to VM’s:
- > virtmgmt.msc
- Hyper-V settings – Server – Enhanced Session Mode Policy – Select “Allow…”
W8-Host
- # Get Hyper-V on Win8
Upgrade W8-Host from Win8 to Win8 Pro- Search and open “Add features to Windows 8” – Enter Licence key.
- # Enable remote VM management
- Open “Control Panel\Programs” – Click “Turn Windows features on”
- # Get new Hyper-V features
Upgrade W8 to W8.1
VM/Guest – Info from module 3 – Creating and Managing Virtual Hard Disks, Virtual Machines, and Checkpoints
Several options for installation
- Convert .iso or .wim to. vhd(x) using Convert-WindowsImage.ps1
- Install from .iso, DVD, network.
- Copy VHD w. OS //Clone
- Differenting VHD’s. Parent must not change.
- Import by copy VHD and then register.
- Virtualizing a physical PC (P2V) using Disk2Vhd – Need to do driver change.
Connect with
- VM Connection – included w. Hyper-V role or RSAT feature. Does RDP via port 2179. Can use EnhancedSessionMode without network.
HyperV-Host
- # Create a switch for a new VM:
- virtmgmt.msc – VirtSwitchMgr – new – Private – Create Virtual Switch
- Name: Priv1, Type: Private, OK //No net access to physical HW including host.
- virtmgmt.msc – VirtSwitchMgr – new – Private – Create Virtual Switch
- # Create a new VM from iso file:
- virtmgmt.msc –
- New -VM
- Name: VmDellBase, (D:\Hyper-V), Next – Generation 2 – Next – 1024 GB, Use DynMem: Y, Next
- Connection: Realtek (ethernet) – Virtual Switch, Next – (Create: D:\Hyper-V\VirtualHardDisks\VmDellBase.vhdx), Size: 20 GB – Next
- Install an OS, Img: D:\iso\en_windows_server_2012_r2_x64_dvd_2707946.iso //From MSDN subscription
- => VM is now created in state = Off
- New -VM
- virtmgmt.msc –

- VmDellBase – RightClick – Settings
- Mgmt – Integration services – select “Guest services” – OK

- VmDellBase – RightClick – Start
- VmDellBase – RightClick – Connect…
- Press any key to boot… //Go through a normal WS install procedure
- Disable Shutdown tracker – see above
- Enable Private Network Discovery – see above
- Control Panel\Appearance\Display\Screen Resolution – 1024 * 768
- In “Virtual Machine Connection” – Action – Insert Integration Services Setup disk – choose resolution 1024 * 768
- Shut down img and make a copy from VmDellBase.vhdx to VmDellBase0.vhdx
This enables you to have an image, that does not yet have been reset with SysPrep (generation 0).
Note: You can Reset Windows Product Activation clock up to three times with SysPrep /generalize, but the copies from a sysprep’ed image you can make as many as you like. - A: Prepare master image:
- ReStart and ReConnect to VmDellBase
- > %systemroot%\SYSTEM32\SYSPREP\sysprep /oobe /generalize
This removes the VMs name and Shuts down the VM. - virtmgmt.msc – VmDellBase – Settings – HW – SCSI Ctrl – Select the HD and remove it.
This avoids starting the VM by mistake.
- # Create a new VM from SysPrep’ed vhdx file:
- B: Deploy Master image:
- Copy D:\Hyper-V\VirtualHardDisks\VmDellBase.vhdx to VmN1Ad.vhdx
- virtmgmt.msc –
- New – VM
- Name: VmN1Ad, (D:\Hyper-V), Next – Generation 2 – Next – 1024 GB, Use DynMem: Y, Next
- Connection: Realtek (ethernet) – Virtual Switch, Next
- Use an existing VHD: D:\Hyper-V\VirtualHardDisks\VmN1Ad.vhdx – Next – Finish
- virtmgmt.msc – VmN1Ad
- Settings – Mgmt – Integration Services – select “Guest services” – OK
- Start
- Connect… => wait for OS to finish install
- Set language settings e.g. keyboard layout
- Enter OS product key
- Enter admin psw
- After boot Enter resolution 1024 * 768 for Enhanced session
- Server Mgr – Local Server – Computer Name
- Desc: AD
- Change name: VmN1Ad
- Boot
- Copy D:\Hyper-V\VirtualHardDisks\VmDellBase.vhdx to VmN1Ad.vhdx
- On HyperV-Host: > ping VmN1Ad
- B: Deploy Master image:
- # Make VmN1Ad a DNS server
- # Assign static IP:
- > ipconfig // read current IPv4 address
- Control Panel\Network and Internet\Network and Sharing Center – Click on connection: Ethernet – Properties – Select item TCP/IPv4 – properties
- Use following IP Address: Enter IP, Subnet and GW from above print
- Use the following DNS: Enter same IP as GW – OK
- In Router assing static IP to VmN1Ad
- Server Mgr – Local Server – Manage – Add Roles&Features – Role-based – Next * – Roles: DNS Server – Press Add Features – Next * – Install
- > dnsmgmt.msc – DNS – VmN1Ad – Forward lookup zones – Action – New zone – Next – Primary – Next – mycom.local
- # Use self as DNS:
- Control Panel\Network and Internet\Network and Sharing Center – Click on connection: Ethernet – Properties – Select item TCP/IPv4 – properties
- Use the following DNS: Enter same IP as IP address – OK
- x
- # Assign static IP:
- # Make VmN1Ad a domain controller
Hyper-V
This is notes from Module 2 – Installing and Configuring the Hyper-V Server Role.
Licencing
- WS: per processor.
- Std: 2 VM’s
- Enterprise: unlimited VM’s
- Hyper-V: 0 VM’s
Limits
- Server: CPU: 320, RAM: 4TB, V-CPU: 2048
- VM: VM’s/Server: 1024, V-CPU: 64, RAM: 1TB, VHD: 64TB, 256 SCSI devices
- Failover Cluster: Nodes/Cluster: 64, VM’s/Cluster: 8000
Install hypervisor
> Get-WindowsFeature *hyper*
> Install-WindowsFeature ...
> ICM server1, server2 {Install-.... }
If you can’t connect to hypervisor:
1) > bcdedit /enum=> hypervisorlaunchtype: Auto
2) Check BIOS
3) Reboot and sometimes power off
Tools
- ServerMgr – Tools – Hyper-V mgr (virtmgmt.msc)
– Can be run from Win8 via SrvMgr after Winfeat Hyper-V mgmt tools are turned on. - Use HVRemote for simpler cfg. What it does
- Enable remote mgmt in workgroup:
- Enable Hyper-V firewall rules
- Create local user with same name and psw
- Add user to Hyper-V admins group
- Grant admin rights remotely to local users
- Enable remote mgmt in workgroup:
- ServerMgr – Hyper-V – Best Practice analyser
CFG
- Host – Server
- VHD’s, VM’s, Phys GPU’s, Storage Migrations, Replication
- NUMA spanning: CPU and mem scaling. Enter max value of no of CPU’s and RAM.
- Enhanced Session Mode Policies: RDP over VMBus. Enables copy/paste without network to VM. Also use of HW devices.
Activate 2 places in host an one in VM: Integration svc’s – Guest svc’s. - Resource pools: When moving VM’s, then NIC names must match, unless mapped through pool
- Host – User

Notes from Module 3 – Creating and Managing Virtual Hard Disks, Virtual Machines, and Checkpoints
CFG – Settings
- VM – HW
- BIOS / Firmware
- MEM //Set min ,max and startup (boot) RAM for dynamic distribution
- Procs //No and % reserve and limit
- Compability
- NUMA //Max CPU, Mem and nodes on a socket
- IDE Ctrl-0, 1
- HD
- DVD
- SCSI Ctrl
- HD
- DVD
- Network Adapter //Legacy, Normal and FC. Connect to switch and limit bandwidth
- Virt FC SAN adapters. Max 4. Access via Host FC HBA (HostBusAdapter) through VirtSAN’s. Use VirtSanMgr to create VirtSAN’s.
Can: VM LiveMigration, VM Failover, MPIO – Multiple paths to SAN.
Can’t: SAN Data LiveMigration, Boot, Checkpoints, Host backup.
- Virt FC SAN adapters. Max 4. Access via Host FC HBA (HostBusAdapter) through VirtSAN’s. Use VirtSanMgr to create VirtSAN’s.
- COM 1, 2
- Diskette Drive
- VM – Guest – Mgmt
- Integration Svc’s (VM Tools – are drivers) – Below svc’s will start as Win Svc’s. Integration Svc’s also comes ootb w. Linux. Gives you LiveMigration, Backup w. DataProtectMgr, Dynamic Mem
- OS shutdown
- Time Sync //Turn off if TimeSource is external opposed to Host
- Data Exch
- HeartBeat
- Backup (vol checpoint)
- Guest svc’s //Enhanced Session Mode
- Checkpoint File location
- Smart Paging File //Allow VM with mem lower than startup RAM to boot via paging file.
- Auto Start / Stop
- Integration Svc’s (VM Tools – are drivers) – Below svc’s will start as Win Svc’s. Integration Svc’s also comes ootb w. Linux. Gives you LiveMigration, Backup w. DataProtectMgr, Dynamic Mem
Running VM’s
- Checkpoint/Snapshots.
- Do Checkpoint to create. Do Apply to rollback (= delete changes). Do Delete to remove a checkpoint (accept changes). The changes are saved using differencing disks, cfg files and saved mem.
- Use only checkpoints in dev/test.
- Do Checkpoint, Apply for the whole group/envir to avoid them getting out of sync.
- Never checkpoint DC (in past). Now OS’s aware of Generation ID can survive getting out of sync with its replicate server by declaring itself invalid and request updates from its replicates.
- Both VM’s and checkpoints can be exported.
Performance Monitoring – use both on host and guest
- Tools
- Task Mgr
- CPU
- Change Graph to
- Logical Procs
- Numa nodes (sockets)
- Change Graph to
- CPU
- Resource Monitor
- CPU
- DISK
- Storage – Disk Queue Length – should be low value
- MEM
- Network
- Reliability monitor (time scaled event log – when were patches installed?)
- Event Viewer (eventvwr.msc)
- Option: View – Show Analytic & Debug Logs //Give much more data
- For Exam: Know which log is used for what.
- On Host:
- Custom Views – Server Roles – Hyper-V
- Windows Logs – Apps & Svc’s – Microsoft – Windows – Hyper-V-…: -VMMS
- Powershell – Resource Meetering //Resource usage (Procs, disk, mem, netw) by VM for charging customers. Feed it into svc manager
- Task Mgr
Virtual Hard Disk Sharing – Using Cluster Shared Volume

Virtual Hard Disk Sharing – Using Scale-Out File Server with SMB 3.0


Notes from Module 4 – Creating and Configuring Virtual Machine Networks
Virtual Switch = VMWare vSwitch
- Practically – use one switch for one physical network adapter or for one teamed network adapter pair.
In prod you would have not many: One representing the physical switch connecting VM’s - On host – when you create switches they appear as network adapters called vEthernet.
- On host: Add one network adapters representing connection to one switch using Hyper-V Mgr – Virtual Switch Mgr or by Powershell.
- #Create vEthernet (Management):
- ps> Add-VMNetworkAdapter -ManagementOS -Name:Management
- Types
- External – connects to physical adapter
- Internal – connects host with guests – good for sandbox or using host as NAT
- Private – connects guests with guests
- #Create External switch called vEthernet (Public) connecting to physical network adapter called Ethernet:
- ps> New-VMSwitch -Name:Public -NetworkAdapterName:Ehternet -AllowManagementOS:$true
- #Create Internal switch called vEthernet (Host)
- ps> New-VMSwitch -Name:Host -SwitchType:Internal
- #Create Private switch called vEthernet (Private)
- ps> New-VMSwitch -Name:Private -SwitchType:Private
- In Virtual Swith Manager you configure the MAC adr range given to VM’s. 3 first sets is Hyper-V “Manufaturer”. 3 last sets are calculated from the host IP adr. Assure that you don’t use all addresses and you don’t give same addr to two VM’s adapters. SC VMM helps distributing those on a larger network. Or you can expand range yourself from 00 00 00 to FF FF FF.
vSwitch types:

VLAN tagging isolate VM nodes
- On Internal and External vSwitches
- Limits to a physical subnet
- Limits to VM’s on same host
- VLAN ID’s has 12 bits – 4096 networks can be created
- Physical switches can have VLAN ID assigned to each port
VMQ


Notes from Module 5 – Virtual Machine Movement and Hyper-V Replica
Moving virtual hard disks


Replicate VMs from one Hyper-V host at a Primary site to another Hyper-V host at the Replica site.


Notes from Module 6 – Implementing Failover Clustering with Hyper-V
Guest Failover Cluster protects the application services running inside your virtual machines. This is now possible using the shared VHDX.


System Center 2012 R2 (SC)
Notes from Module 7 – Installing and Configuring SC Virtual Machine Manager (VMM)
Use Powershell Deployment Toolkit (PDT) to build a SystemCenter environment – in prep edit config xml to local prefernces. It includes downloads, accounts, SQL installation (std edition – license included).
Use datacenter or standard edition to get VMM.
System Center includes:
- Virtual Machine Manager (VMM) // Extended Hyper-V manager
- App Controller //Web version of VMM – without infra mgmt – using VMM to provision to private cloud or Azure to provision to public cloud
- Operations Manager // Montoring
- Data Protection Manager (DPM) // Backup/Restore
- Service Manager // Help Desk – Work Items: Activity, Change, Incident, Problems, Release mgmt and Service Request using cfg db – Implements ITIL build with MOF
- Orchestrator // Workflow designer – Graphical scripting – pass parameters from a set of activities to another set
Extra:
- Windows Azure Pack: Deploy Azure services (public cloud) on-premise. Access from Azure (website, VM) to private cloud. App communication via service bus
- SC Advisor runs as an add-on to OperationMgr. It is a proactive tool to tells about best practices to follow based on facts from OperationMgr.

VMM
1 VMM server supports 1000 hosts ans 25.000 VMs.
HostGroups based on whatever your needs are e.g.
- Public/Private
- Location e.g. primary/recovery
- Old HW for test, new for prod
- Function
- Can be nested
WorkSpaces
- VMs and Services // Mobility, Replica, Failover
- Fabric // Infra: Servers, Hosts & Clusters, Storage, Network, NLB
- Library // Templates
- Jobs
- Settings
Create Jobs:
- BareMetal deployment (Hyper-V Host server): Choose Fabric – Add server – physical server. OEM has installed Baseboard Mgmt Ctrl (BMC) – kind of pre OS (e.g. HP iLO, Dell iDRAC) – to require e.g. IP. Choose a domain admin account.
- VM provisioning: Choose Fabric – Add server – windows server. Choose local admin account
Tip: The wizard generate powershell scripts that can be easily modified for repeating work.
Jobs consists of a set of tasks (the powershell cmds).
Jobs can be restarted (= rerun the powershell cmdlets)
Notes from Module 8 – Managing the Networking and Storage Infrastructure in SC Virtual Machine Manager (VMM)
VMM Fabric continued: Clusters, Storage, Network
VMM – Fabric – Networking:
- Logical Networks // naming physical subnets – like DNS for IP. Use separate subnet for storage
- MAC adr pools // build in ranges – see hyper-V above. You can define own ranges.
- NLBs // WinSrv feature (SW LB) – or HW LBs like F5, BigIP. Tip: You can scale SW LBs in VMs
- Virtual IP templates // LB uses VIP as entry point that will fork to each clustered node
- Logical switches // naming and configuring physical switch
- Port profiles // E.g. Host mgmt, High bandwidth adapter, Cluster, Live migration. Needs to be tied to network – just starting point/sample names exists – for assigning to ports on hosts
- Port classifications // as above – for tagging network adapters and switch ports
- Network service // 3rd party extension e.g. Network manager (Xen server), gateway, virtual switch extension
Add network for VM outbound traffic: Logical Networks – Add – Enter a name “Contoso-corp”- Select “One connected..” – Select “Allow new…” – Add Network site: (associate VLANs to host groups and IP subnets) Select all host groups – Press Insert Row – IP subnet: 10.0.0.1/24 – next
Add network for VM storage: Logical Networks – Add – Enter a name “Contoso-storage” – Select “One connected..” – Add Network site: (associate VLANs to host groups and IP subnets) Select all host groups – Press Insert Row – IP subnet: 20.0.0.1/24 – next
Connect network to server: Servers – Select a VM – props – HW – Network Adapters – Ethernet – Select Contoso-corp
Connect network to server: Servers – Select a VM – props – HW – Network Adapters – Ethernet2 – Select Contoso-storage
Create IP pool to get IPs from, when using the network: Logical Networks – Select “Contoso-corp” – Create IP pool – Name: “Corp-IPpool” – Next – limit the range a bit – next – Enter 10.0.0.1 for default GW – next – Enter 10.0.0.1 for DNS – Suffix: contoso.com
Create IP pool to get IPs from, when using the network: Logical Networks – Select “Contoso-storage” – Create IP pool – Name: “Storage-IPpool” – Next – limit the range a bit – next – Enter 10.0.0.1 for default GW – next – Enter 10.0.0.1 for DNS – Suffix: contoso.com
Logical switch – Create – Name: ContosovSwtich – next
VMM – VMs and Service:
- Tenants // Admin roles
- Clouds
- VM Networks
- Storage
- All Hosts
Tenants – Add – Name: EndUser – Role: App Admin – Next
VM Networks – Create – Name: ContosoVMnet – Logical net: Contoso-Corp – next – Add subnet – Name: Net2, Subnet: 10.0.0.1/24 – next
Storage
- Block Storage types
- Fibre Channel (FC) + Virtual FC
- iSCSI
- File Storage types
- SMB3.0 // for (clustered) scale-out file server (SOFS)
- NFS // for VMWare
VMM – Fabric – Storage:
- Classifications & Pools // Generic classes: iSCSI, SSD. Or specific classes – as you like.
- Providers
- Arrays
- File Servers
- Fibre Channel Fabrics
Storage – Classification – Create – Name: Gold (tier). Create also Bronze //tie to array iSCSI (SMI-S WMI)
Storage – Providers – Create – Windows based – IP or FQDN: DC01 – Select share: ClusterShare. Appoint Gold
Storage – Arrays – view – displays iSCSI drives
Ribbon – Create Logical Unit (LUN) – select iSCSI drive: F – Name: LUN1 – Size: 20 (GB)
Ribbon – Create File Share – select srv – Name: VMShare1 – Select class Gold – Create new path: C:\Shares\VMShare1
Fabric – All Hosts – props – Host Reserves – View
Fabric – All Hosts – props – Storage – Allocate LUN – select LUN1 – add
Patching
WSUS for collect baseline
Going to do same procedure as Cluster Aware Update: Drain node (host) – patch – checks: startup?, OK patch?, (rejoin cluster?) – Unpause – (fail back if set so)
If bad patch then procedure stops to let admin fix.
Config Mgr can be used with WSUS as intermedeary.
Failover Clustering
64 servers, 8000 VMs
Share Storage using SMB, iSCSI, FC, SAS
Dynamic Optimization: LiveMigrates VMs to distribute load on CPU, Mem, disk and network IO when going above treshold
Power Optimization (dependent on dynamic opt): LiveMigrat VMs to let node go to sleep, when going below treshold e.g. over night
Create cluster1
Fabric – cluster1 – props – Available storage – add – select LUN1 – Label: CSV1 – select format – Convert to CSV
Fabric – cluster1 – props – (Cluster) Shared Volumes – add – select VirtualDiskIndex:xxxx – Label: CSV3
Fabric – cluster1 – props – File Share Storage – add – select \\DC01.contoso.com\ClusterShare
Cluster Mgr – Storage – Disks – view
Notes from Module 9 – Configuring and Managing the SC Virtual Machine Library (VML)

VMM Library – Deploy one to each branch office (much data)
VMM – Library:
- Templates // Collection of profiles
- Service Deployment cfg
- Service templates
- VM templates
- Profiles // Building blocks
- App: SQL, Web
- Capability: Hyper-V, Esx, Xen – for host
- Guest OS: SQL, Web – for VM. ID: Use ## or * for names
- HW: SQL, Web – for VM
- Physical computer: For host
- SQL server: SQL
- Equivalent objs
- Cloud libs
- Self service user content
- Library servers //Add server – then add a share
- Update catalogue and baselines
Library – templates – VM templates – add – Browse – select vhdx – Name it
Notes from Module 10 – Creating and Managing Virtual Machines (VMs) by Using SC Virtual Machine Manager (VMM)
Notes from Module 11 – Managing Clouds in SC Virtual Machine Manager (VMM)
- Cloud Tenants does not have to be different companies – it can be departments or other groups.
- Tenants enables allocate logical capacity from resource pools.
- Host groups are for infra groups
- Clouds are for end-user groups through self service – e.g. SQL DBA needing resources
From Virtual to Cloud:
- Automated mgmt (SC VMM)
- pools of compute resources (SC VMM) + mem, storage, network.
- self-service provisioning (SC App Ctrl)
- usage-based chargeback (SC Service Mgr) – used for showback
Groups and individuals can be assigned capacity (cloud shaping)
Managing cloud:
- chargeback (SC Service Mgr)
- app performance monitoring (SC Operations Mgr)
- always up and on – monitor your app in the public cloud by uploading own testcases from different places in the world (SC Global Service Monitor (GSM))
- SLA based
VMM – VMs & services – Clouds – Create – Name: Contoso-cloud – select resources as host group(s) (or VMWare resource pools) – select various resources – don’t give access to local storage – select VMM library closest to location of users – for capacity set max (for this main cloud) except for mem
VMM User Roles based on AD creds contains:
- Profiles/Templates, Members, Scope, Network,
- Cloud Quotas, Resoources, Permissions, RunAs accounts
Many User Roles in one cloud
Limit:
- access to objects (resources)
- Actions to perform on resources e.g. checkpoints
User Role Profiles:
- (Main)Admin
- Fabric admin (= delegated admin) // HW – scoped to host group(s)
- Read-Only admin // monitor/firefighters/1st line support
- App admin (= self service user) // SW – touching VMs & services
- Tenant admin // mng app admins
VMM – Settings – Security – User Roles – Create – Developers – select various resources
Log in as dev: VMM – Open New connection – Creds: contoso\somedev
Notes from Module 12 – Managing Services in SC Virtual Machine Manager (VMM) and App Controller
A group of VMs like webappp and SQL can give a service that can be deployed and managed as single entity.
A service model allows you to cfg relation and build out.
Service Template updates:
- In-place
- Image
- Template
VMM – Library – Templates – Service Templates – Create – Name: MyAppService, Release: 1.0, Patterns: Two Tier => Service Template Designer
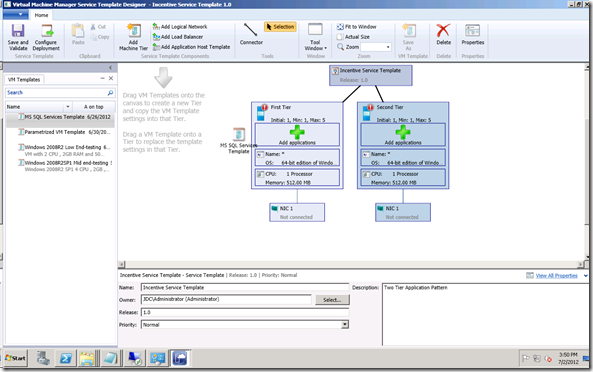
– Drag´n´drop VM templates (left) to large “+” on tier (right)
– Ribbon – Add VM Network – Browse – Select “Contoso-VMNet” //this is the switch
– Ribbon – Connector – Drag´n´drop from NIC1 to Contoso-VMNet. Do for all NICs
Could also add NLB
– Save
– Select a tier to change props like deployment order, scale out limits, upgrade domains, availability sets (for SQL cluster)
– Ribbon – Configure Deployment – Name MyAppService1 – select cloud => Deploy service wizard
– Ribbon – Deploy Service
App Controller
Services – Deploy – Configure – Select a cloud – Select a template – VM Configure – Add name – Deploy
Notes from Module 13 – Protecting and Monitoring Virtualization Infrastructure
SC Data Protection Mgr
- Backup – can even restore a SP file through SiteCollection and folder = Item Level Recovery (ILR) – by using SP level backup by VM DPM Agent (opposed to Host DPM Agent)
- Backup during LiveMigration
- Replicate
- Consistent snapshot: VSS takes volume shadow copy with committed changes, since each app has its own app specific VSS writer and knows how to make the app consistent.
Components:
- Put DPM protection agents on VMs and hosts
- Install agents – automatic via console or manually on target – open in FW
- Cfg protection groups – containing data sources groups with common schedule etc.
- DPM has srvs + SQLs + console
SC Operations Mgr
Using HW and SW specific Mgmt Pack for monitoring apps or devices
On VMM srv it can use PRO Tips – reads alerts and take action on alerts. Like Dynamic Optimization it has limits for CPU, Mem, disk and network IO, but it can read on everything else before it triggers LiveMigration or other action. It is the most extensible.
Fabric Health Dashboard and Fabric Monitoring Diagram is yet some monitoring of VMM by OPs Mgr.
Events in Ops Mgr can trigger actions in e.g. Service Mgr or Orchestrator
Other
Online courses
- http://mslcampaignfactory.com/EventURL/ServerVirtualization.aspx
- 2014-02-10 20-22 CEST: Masterclass What’s new in Hyper-V in Windows 8 en Windows 2012
- 2014-01-21 9-11:30AM PST: Server Virtualization Tech Showcase
ongoing…
The End.

Leave a comment